基于Handsome主题美化
无需修改源文件
1、首页文章图片获取焦点放大
将以下代码添加至后台主题设置自定义CSS,放大的时间和大小自行修改数值
/*首页文章图片获取焦点放大1*/
.item-thumb{
    cursor: pointer;
    transition: all 0.6s;
}

.item-thumb:hover{
      transform: scale(1.05);
}

.item-thumb-small{
    cursor: pointer;
    transition: all 0.6s;
}

.item-thumb-small:hover{
    transform: scale(1.05);
}
2、鼠标经过头像转动并放大
将以下代码添加至后台主题设置自定义CSS,转动快慢和头像大小自行修改数值
/*首页头像自动旋转*/
.thumb-lg{
    width:130px;
}

.avatar{
    -webkit-transition: 0.4s;
    -webkit-transition: -webkit-transform 0.4s ease-out;
    transition: transform 0.4s ease-out;
    -moz-transition: -moz-transform 0.4s ease-out;
}

.avatar:hover{
    transform: rotateZ(360deg);
    -webkit-transform: rotateZ(360deg);
    -moz-transform: rotateZ(360deg);
}

#aside-user span.avatar{
    animation-timing-function:cubic-bezier(0,0,.07,1)!important;
    border:0 solid
}

#aside-user span.avatar:hover{
    transform:rotate(360deg) scale(1.2);
    border-width:5px;
    animation:avatar .5s
}
3、Mac风格代码高亮
CodePrettify插件下载:点击下载
Handsome 5.3.1 版本:点击下载
如果你的网站有开启Pjax(Handsome主题默认开启),把以下代码添加到回调函数的地方,以Handsome为例,打开后台设置PJAX回调函数
if (typeof Prism !== 'undefined') {
var pres = document.getElementsByTagName('pre');
                for (var i = 0; i < pres.length; i++){
                    if (pres[i].getElementsByTagName('code').length > 0)
                        pres[i].className  = 'line-numbers';}
Prism.highlightAll(true,null);}
4、魔性动态标题
复制下方代码添加至后台主题设置自定义输出head 头部的HTML代码即可
<!--动态标题-->
<script>document.addEventListener('visibilitychange',function(){if(document.visibilityState=='hidden'){normal_title=document.title;document.title='(つ·ェ·⊂)404 not find';}else{document.title=normal_title;}});</script>
5、文本框打字机特效
复制下方代码添加至后台主题设置自定义输出body 尾部的HTML代码即可
<!--文本框打字机特效-->
<script type="text/javascript" src="http://sh.bailaing.me:85/usr/themes/handsome/assets/js/commentTyping.js"></script>
6、复制弹框版权提醒
首先将下方代码复制添加至后台主题设置自定义输出head 头部的HTML代码
<!--复制弹框JS-->
<script src="http://sh.bailaing.me:85/usr/themes/handsome/assets/js/layer.js"></script>最后复制下方代码添加至后台主题设置自定义 JavaScript即可
<!--复制弹框-->
document.body.oncopy = function() {layer.msg('复制成功,若要转载请务必保留本文链接!');};
7、文章底部赞赏图标跳动
将以下代码添加至后台主题设置自定义CSS
/*赞赏图标跳动*/
.btn-pay {
    animation: star 0.5s ease-in-out infinite alternate;
}

@keyframes star {
    from {
        transform: scale(1);
    }

    to {
        transform: scale(1.1);
    }
}
8、彩色标签云Tag
打开后台-更改外观-设置外观-开发者设置-复制代码粘贴至自定义JavaScript即可
<!--彩色标签云-->
let tags = document.querySelectorAll("#tag_cloud-2 a");
let colorArr = ["#428BCA", "#AEDCAE", "#ECA9A7", "#DA99FF", "#FFB380", "#D9B999"];
tags.forEach(tag => {
    tagsColor = colorArr[Math.floor(Math.random() * colorArr.length)];
    tag.style.backgroundColor = tagsColor;
});如果主题中启用了pjax,还需要将上面代码添加到pjax-pjax回调函数中。
9、右侧列表导航栏图标颜色
打开后台-更改外观-设置外观-开发者设置-复制代码粘贴至自定义CSS即可
/*右侧列表导航栏图标颜色*/
.glyphicon-fire {
    color: #ff0000;
}

.nav-tabs-alt .glyphicon-comment {
    color: #495dc3;
}

.glyphicon-transfer {
    color: #0e5458;
}
10、文章首页广告位显示倒计时
2020新年倒计时
<style>
.gn_box {
    border: none;
    border-radius: 15px;
}

.gn_box {
    padding: 10px 14px;
    margin: 10px;
    margin-bottom: 20px;
    text-align: center;
    background-color: #fff;
}

#t_d {
    color: #982585;
    font-size: 18px;
}

#t_h {
    color: #8f79c1;
    font-size: 18px;
}

#t_m {
    color: #65b4b5;
    font-size: 18px;
}

#t_s {
    color: #83caa3;
    font-size: 18px;
}
</style>
< div class = "gn_box" > <h1 > <font color = #E80017 > 2 < /font><font color=#D1002E>0</font > <font color = #BA0045 > 2 < /font><font color=#A3005C>0</font > <font color = #8C0073 > 年 < /font><font color=#75008A>-</font > <font color = #5E00A1 > 新 < /font><font             color=#4700B8>年</font > <font color = #3000CF > 倒 < /font><font color=#1900E6>计</font > <font color = #0200FD > 时 < /font>     </h1 > <center > <div id = "CountMsg"class = "HotDate" > <span id = "t_d" > 天 < /span>             <span id="t_h"> 时</span > <span id = "t_m" > 分 < /span>             <span id="t_s"> 秒</span > </div>     </center >
</div >
<script type = "text/javascript" >

function getRTime() {
    var EndTime = new Date('2020/06/25 00:00:00');
    var NowTime = new Date();
    var t = EndTime.getTime() - NowTime.getTime();
    var d = Math.floor(t / 1000 / 60 / 60 / 24);
    var h = Math.floor(t / 1000 / 60 / 60 % 24);
    var m = Math.floor(t / 1000 / 60 % 60);
    var s = Math.floor(t / 1000 % 60);
    document.getElementById("t_d").innerHTML = d + " 天";
    document.getElementById("t_h").innerHTML = h + " 时";
    document.getElementById("t_m").innerHTML = m + " 分";
    document.getElementById("t_s").innerHTML = s + " 秒";
}

setInterval(getRTime, 1000);
</script >
11、本站添加AliceStyle美化插件

需要修改源文件
1、底部页脚标签样式
将以下代码添加至后台主题设置自定义CSS
/*底部页脚*/
.github-badge {
  display: inline-block;
  border-radius: 4px;
  text-shadow: none;
  font-size: 12px;
  color: #fff;
  line-height: 15px;
  background-color: #abbac3;
  margin-bottom: 5px
}

.github-badge .badge-subject {
  display: inline-block;
  background-color: #4d4d4d;
  padding: 4px 4px 4px 6px;
  border-top-left-radius: 4px;
  border-bottom-left-radius: 4px
}

.github-badge .badge-value {
  display: inline-block;
  padding: 4px 6px 4px 4px;
  border-top-right-radius: 4px;
  border-bottom-right-radius: 4px
}

.github-badge .bg-blue {
  background-color: #007ec6
}

.github-badge .bg-orange {
  background-color: #ffa500
}

.github-badge .bg-red {
  background-color: #f00
}

.github-badge .bg-green {
  background-color: #3bca6e
}

.github-badge .bg-purple {
  background-color: #ab34e9
}将以下代码添加至后台主题设置博客底部左侧信息,信息修改成自己的
<div class="github-badge">
<a href="./" title="©2019 白亮吖雅黑丫">
<span class="badge-subject">Copyright</span><span class="badge-value bg-blue">©2019 白亮吖雅黑丫</span>
</a>
</div>将以下代码添加至后台主题设置博客底部右侧信息
<div class="github-badge">
<a href="http://www.typecho.org" target="_blank" title="由 Typecho 强力驱动" style="cursor: url("/usr/plugins/HoerMouse/static/image/dew/link.cur"), pointer;">
<span class="badge-subject">Powered</span><span class="badge-value bg-blue">Typecho</span>
</a>
</div>
|
<div class="github-badge">
<a href="https://www.ihewro.com/archives/489/" target="_blank" title="站点使用 handsome 主题,作者:友人C" style="cursor: url("/usr/plugins/HoerMouse/static/image/dew/link.cur"), pointer;">
<span class="badge-subject">Theme</span><span class="badge-value bg-orange">Handsome</span>
</a>
</div>添加完成后,记得去
handsome\component\footer.php删除原有声明代码哦!
2、添加心知天气
使用方法:
1:知心天气官网www.seniverse.com注册申请免费API 密钥
2:将以下代码放入/usr/themes/handsome/component/headnav.php第55行之后并更换你的公钥秘钥即可
<!-- 知心天气-->
    <div id="tp-weather-widget" class="navbar-form navbar-form-sm navbar-left shift"></div>
<script>(function(T,h,i,n,k,P,a,g,e){g=function(){P=h.createElement(i);a=h.getElementsByTagName(i)[0];P.src=k;P.charset="utf-8";P.async=1;a.parentNode.insertBefore(P,a)};T["ThinkPageWeatherWidgetObject"]=n;T[n]||(T[n]=function(){(T[n].q=T[n].q||[]).push(arguments)});T[n].l=+new Date();if(T.attachEvent){T.attachEvent("onload",g)}else{T.addEventListener("load",g,false)}}(window,document,"script","tpwidget","//widget.seniverse.com/widget/chameleon.js"))</script>
<script>tpwidget("init", {
    "flavor": "slim",
    "location": "WSB117TP0EC6",
    "geolocation": "enabled",
    "language": "auto",
    "unit": "c",
    "theme": "chameleon",
    "container": "tp-weather-widget",
    "bubble": "enabled",
    "alarmType": "badge",
    "color": "#C6C6C6",
    "uid": "公钥",
    "hash": "密钥"
});
tpwidget("show");</script>
<!-- 结束-->
3、添加访客总数统计和网站响应耗时
在主题的function.php文件中加入以下代码(添加在文件尾即可)
由于handsome6.0.0主题将function.php文件加密,所以将以下代码添加的位置改为component/sidebar.phplib/Content.php文件中
/**
 * * 访客总数
 * */
function theAllViews()
{
    $db = Typecho_Db::get();
    $row = $db->fetchAll('SELECT SUM(VIEWS) FROM `typecho_contents`');
    echo number_format($row[0]['SUM(VIEWS)']);
}

/**
 * 网站响应时间
 * @return bool
*/
function timer_start() {
    global $timestart;
    $mtime     = explode( ' ', microtime() );
    $timestart = $mtime[1] + $mtime[0];
    return true;
}
timer_start();
function timer_stop( $display = 0, $precision = 3 ) {
    global $timestart, $timeend;
    $mtime     = explode( ' ', microtime() );
    $timeend   = $mtime[1] + $mtime[0];
    $timetotal = number_format( $timeend - $timestart, $precision );
    $r         = $timetotal < 1 ? $timetotal * 1000 . " ms" : $timetotal . " s";
    if ( $display ) {
        echo $r;
    }
    return $r;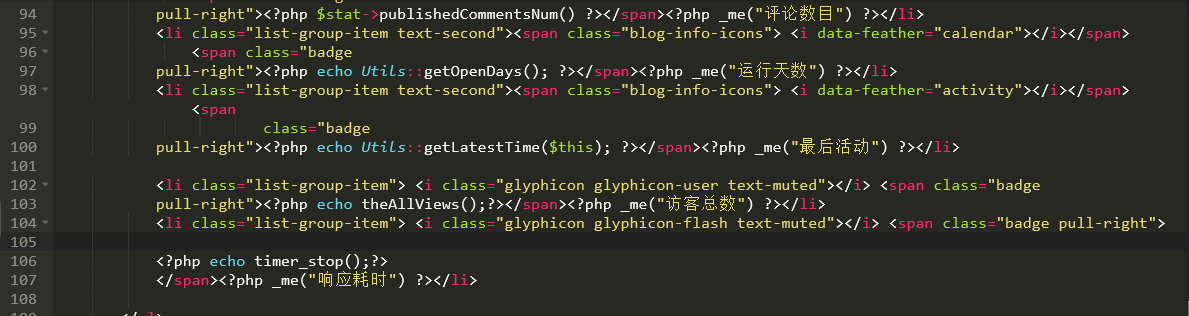
}然后打开component/sidebar.php文件,在约100行的位置添加如下代码
<li class="list-group-item"> <i class="glyphicon glyphicon-user text-muted"></i> <span class="badge pull-right"><?php echo theAllViews();?></span><?php _me("访客总数") ?></li>
<li class="list-group-item"> <i class="glyphicon glyphicon-flash text-muted"></i> <span class="badge pull-right">
<?php echo timer_stop();?>
</span><?php _me("响应耗时") ?></li>
如图所示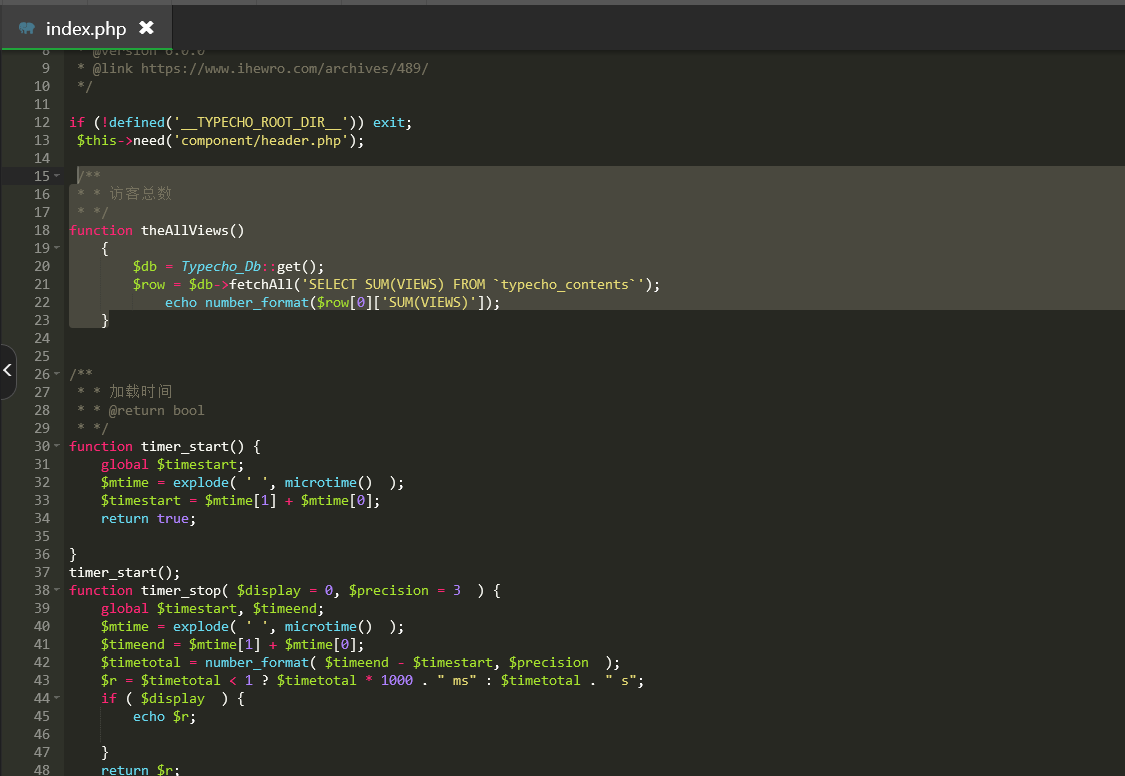
4、为文章添加百度收录检测
原文地址
1.在模板post.php加入
<!--百度收录-->
<li class="meta-baidu"><span class="post-icons"><i class="glyphicon glyphicon-refresh" id="baidu_icon"></i></span><span class="meta-value" id="baidu_result">加载中</span></li>
2.还是在post.php内加入(必须引入jquery)
<script>
        function baidu_check(){
            $.getJSON("https://www.m39.wang/baidu.php?domain="+window.location.href,function(result){
                if (result.code == 200) {
                    $('#baidu_icon').removeClass('glyphicon-refresh');
                    $('#baidu_icon').addClass('glyphicon-ok-circle');
                    $('#baidu_result').text('百度已收录');
                }else if(result.code == 403){
                    $('#baidu_icon').removeClass('glyphicon-refresh');
                    $('#baidu_icon').addClass('glyphicon-info-sign');
                    $('#baidu_result').text('百度未收录');
                }else{
                    $('#baidu_icon').removeClass('glyphicon-refresh');
                    $('#baidu_icon').addClass('glyphicon-remove-circle');
                    $('#baidu_result').text('查询收录失败');
                }
            });
        }
        baidu_check();
</script>
该API代码文件如下
<?php
/**
 * Baidu
 * @editer: Weifeng
 * @link: https://wfblog.net
 * @version: 1.0
 */

error_reporting(0);
header("Access-Control-Allow-Origin:*");
header('Content-type: application/json');

$domain = @$_GET['domain'];
if(!isset($domain) || empty($domain) || $domain==''){
    $data = array(
        "code" => false,
        "msg" => "未传入请求参数!"
    );
    echo json_encode($data,JSON_UNESCAPED_UNICODE);
    exit;
}

$data = checkBaidu($domain);
echo json_encode($data,JSON_UNESCAPED_UNICODE);

function checkBaidu($url){
    $header = array(
        "Host:www.baidu.com",
        "Content-Type:application/x-www-form-urlencoded",//post请求
        "Connection: keep-alive",
        "Referer:https://www.baidu.com",
        "User-Agent: Mozilla/5.0 (Windows NT 10.0; Win64; x64) AppleWebKit/537.36 (KHTML, like Gecko) Chrome/80.0.3987.162 Safari/537.36"
    );
    $url = 'https://www.baidu.com/s?ie=UTF-8&wd='.urlencode($url).'&usm=3&rsv_idx=2&rsv_page=1';
    $ch = curl_init();
    curl_setopt($ch, CURLOPT_URL, $url);
    curl_setopt ($ch, CURLOPT_HTTPHEADER, $header);
    curl_setopt($ch, CURLOPT_FOLLOWLOCATION,1);
    curl_setopt($ch, CURLOPT_RETURNTRANSFER, 1);
    $output = curl_exec($ch);
    curl_close($ch);
    if(strpos($output, '没有找到') || strpos($output, '很抱歉')){
        $data = array(
            "code" => 403,
            "msg" => "该域名暂时未被百度收录!"
        );
    }else{
        $number = GetBetween($output,'<span class="nums_text">百度为您找到相关结果约','个</span>');
        if(empty($number) || $number == 0){
            $number = GetBetween($output,'<b>找到相关结果数约','个</b></p>');
            if(empty($number) || $number == 0){
                $data = array(
                    "code" => false,
                    "msg" => "获取百度收录失败!"
                );
                return $data;
            }
        }
        $data = array(
            "code" => 200,
            "msg" => "该域名已被百度收录!",
            "number" => str_replace(',','',$number)
        );
    }
    return $data;
}

function GetBetween($content,$start,$end){
    $r = explode($start, $content);
    if (isset($r[1])){
        $r = explode($end, $r[1]);
        return $r[0];
    }
}
?>